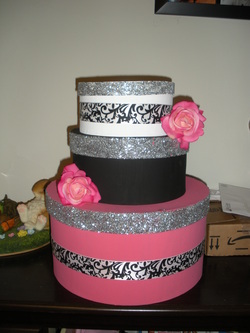
My bling-tastic card box!
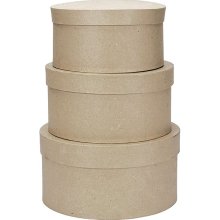
The starting point (I used different size boxes then this)
Supplies needed:
1) Paper Mache boxes, I used 14 inch, 9 inch, and 8 inch
2) Paint Select: I chose white, black, and hot pink
3) Ribbon: I purchased mine at Michaels and will be using it through out my wedding
4) Glitter!: I chose loose glitter and it made a mess but I love the way it turned out totally worth the mess
5) Floral Stems: I chose 2 roses to accent
6) Cut out letters that spells "CARDS": Have not found mine yet but I am on the lookout for good ones
7) Rhinestones: for the top of the box, where the card inserts
8) Cutting supplies and glue!
Forgot to take a picture of each step but I will map it out for it.
1) Paint each layer of the paper mache boxes, it took around 2-3 layers of paint
2) Apply glue to the rims of the tops and sprinkle with glitter (word of advice spread the glue and don't use too much because it will drip and sink down onto the boxes
3) Apply ribbon, this was the hardest part and they are still not straight, I will have to work on getting it on there just right
4) Apply Flowers, mine are not on there yet because I still have to cut the holes in the boxes and glue them together (I am waiting until i find the card letters and Brent's approval)
***Finished product to come soon****
